Saturday, May 8, 2010
Q - I turned on my hot water and it is rusty?
A - Many people today have concerns about the safety of the water they are drinking. Rust in water is a very common issue. In fact, when pipes become galvanized, they rust and that is what you sometimes see in your water. Then the best solution would be to replace the pipes. Sometimes the rust in the water can come from your water heater. In this case you can check your water heater manual on cleaning your water heater. It is a good idea to call a plumber to check where the rust is coming from so the correct course of action can be taken.


Sunday, May 2, 2010
Efflorescence
Efforscence
Where does it come from?
Two conditions must be present to create efflorescence:
- A source of water soluble salts.
- Water moving through the material to carry the salts to the surface. The water evaporates and leaves the white powder behind.
- They might be more permeable and promote water travel.
- They might tend to have higher water soluble salts in some batches.
The causes and treatments of efflorescence are the same, regardless of the material on which it appears. Flooring, roofing, walls and their component materials only vary in the product application technique, as described on product labeling.
Water sources can be:
- IN/OUT - Entering at the surface (rain or sprinklers), penetrating in a fraction of an inch, then returning to the surface carrying the salts.
- THROUGH - Entering from behind (bad flashing, caulking, leaks) or underneath (water from the earth migrating up) and traveling through.
There are two kinds of efflorescence.
- Regular "powdery" efflorescence as described above and is still gone after "Efflorescence Treatment" dries.
- "Crystalline" efflorescence. When powdery efflorescence goes through cycles of being deposited on the surface - re dissolved when new water occurs - drying out - new water - etc. it can form crystals. The crystals become tightly bonded to the surface. The crystals do not have to be thick. A light haze that is still there after using "Efflorescence Treatment" will be light crystal formation and is treated as described below.


This is a worst case efflorescence condition. And - this is the interior wall! The extensive blooming was caused by long term, heavy water intrusion from bad flashing. The wall is the interior wall of "double wythe" construction. This is where two brick walls separated by an air gap serve as one structural wall. Within the air gap is a supply of water soluble salts that has lasted for years. Rainwater has been flowing into the wall gap and carrying salts out for a long time.

Is this efflorescence or mineral deposits? It could be either or both. It appears to be a pattern from a sprinkler hitting the wall. It could be minerals in the water that are left behind. It could be the water soaking into the block wall and coming out again carrying internal salts. Or, it could be both.
How can it be cleaned? "Powdery" efflorescence only requires a simple application of Aldon "Efflorescence Treatment".
- "Efflorescence Treatment" is not a cleaner that must be rinsed or removed.
- "Efflorescence Treatment" carries the salts below the surface.
- "Efflorescence Treatment" enhances the surface color.
"Crystalline" efflorescence can not be moved by "Efflorescence Treatment" because of the crystal's attachment to the surface. That is why you may treat a surface with "Efflorescence Treatment" and it looks great for a few hours. But then, when it dries you can see some efflorescence deposits remaining. They are not new deposits coming out. They were just temporarily disguised by the darkening effect of the initial treatment. The reappearing efflorescence is crystalline and is bonded to the surface. These deposits will "fizz" on contact with a strong acid (pool acid, muriatic acid), but do not use that acid for cleaning. A safer, but just as strong product to remove the deposits is:
- First - remove crystal deposits with Aldon Grout Residue Remover.
- Note: If there is no fizzing reaction and the crystals are not removed, this is not efflorescence.
- Then - treat with Aldon "Efflorescence Treatment" for any remaining powdery efflorescence and to enhance surface color.
How it can be stopped!
After treating the surface to restore its appearance, you can prevent future efflorescence by applying one of Aldon's penetrating sealers per directions. This is true even if the water is coming from behind or subsurface and cannot be stopped.
Laboratory Test Proving:
Efflorescence Can Be Stopped By Aldon Sealers!
Efflorescence Can Be Stopped By Aldon Sealers!
Test Procedures:
- Using a red clay brick - designation: "Common". The dark color and high permeability show efflorescence easily.
- The brick is partially submerged in a pan of water with 5% sodium carbonate (water soluble salt).
- The Pan is covered with plastic wrap with a hole cut at the brick face only. This forces water to migrate through the brick.
- A fan is blowing air across the surface to accelerate the water migration.
- These conditions are worse than most real world situations.
- All brick are from the same pallet to minimize differences.
- The "control" brick shows what happens with no Aldon sealer.
The Aldon penetrating sealers create a barrier below any absorbent surface that allows water vapor to "breathe" out, but stops the water soluble salt molecules from migrating out.
Note: You can have efflorescence after sealing with another companies sealer, so do not expect the results from an Aldon sealer to apply to all sealers.
If white stains appear after properly sealing an Aldon installation, they are not efflorescence. They are probably mineral deposits from rain water runoff or sprinklers that are on top of the sealer.Note: You can have efflorescence after sealing with another companies sealer, so do not expect the results from an Aldon sealer to apply to all sealers.
Painting the finish:
You need the sealer penetrated down below the surface to stop efflorescence. The problem with then painting the surface is that the sealer is a "bond breaker" and does not provide good adhesion for the paint. If you really must paint the surface also, take the gloss down to the surface and then use sandpaper to roughen up the surface to improve the "grabbing" ability of the paint.
Sunday, April 25, 2010
Aqua Globes
Hello fans!!! I've hoped you've enjoyed our home gardening tips. This week we'll be finishing up with
(I was making these long before they we ever AS Seen On -cough- *TV*)
Supplies needed:

First take your gallon jug and remove the cap. With your needle poke holes in the milk cap. Fill milk jug with water and replace cap.

Second take your pvc pipe and measure about 6 inches. Using your saw cut the pipe to the 6 inch length. Now this part is optional I had it work both way. Drill small holes all the way around up and down the 6 inch pipe you just cut.

Hammer the pipe into the ground about 75% of the way into the ground close to the plant. Pull the pipe out of the ground and remove the dirt inside the pipe. Place the pipe in the hole and hammer completely into the ground. Make sure the ground level is just slightly above the end of the pipe.

The idea of this is to create a dirt plug at the end of the pipe, which will act like a sponge and the roots will slowly remove water when its needed.

Finally, Take your jug and invert it and place it on top of the pipe. The cap will fit inside the hole. Make sure its standing straight up and down, because it will create a suction and hold right there. Refill jugs every couples of days or whenever empty.
images provided by: Stephanie Shorter
Homemade Aqua Globes
Supplies needed:
- A gallon jug
- A needle
- 1 1/2 inch pvc pipe
- Hand saw
- Drill with tiny drill bit
- Measuring tape

First take your gallon jug and remove the cap. With your needle poke holes in the milk cap. Fill milk jug with water and replace cap.

Second take your pvc pipe and measure about 6 inches. Using your saw cut the pipe to the 6 inch length. Now this part is optional I had it work both way. Drill small holes all the way around up and down the 6 inch pipe you just cut.

Hammer the pipe into the ground about 75% of the way into the ground close to the plant. Pull the pipe out of the ground and remove the dirt inside the pipe. Place the pipe in the hole and hammer completely into the ground. Make sure the ground level is just slightly above the end of the pipe.
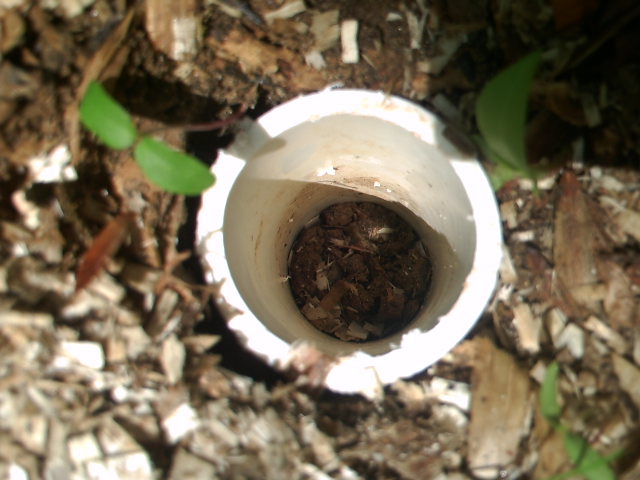
The idea of this is to create a dirt plug at the end of the pipe, which will act like a sponge and the roots will slowly remove water when its needed.

Finally, Take your jug and invert it and place it on top of the pipe. The cap will fit inside the hole. Make sure its standing straight up and down, because it will create a suction and hold right there. Refill jugs every couples of days or whenever empty.
images provided by: Stephanie Shorter
Monday, April 19, 2010
Sunday, April 18, 2010
Stump Removal
How To Remove Tree Stumps
I spent 2 weeks in my yard removing tree stumps and I came across different ways to remove them. Removing tree stumps is hard work and can be tiresome depending how big it is. You can either try one of these methods.
- 1. If you can a truck with a tow package on it, hook a thick chain around a tree that hasn't been cut short and yank it out. Refill the hole with dirt.
- 2. Dig around the tree, cutting the roots as you go along until you get deep enough. Use a reciprocating saw to cut through the thick roots. Once the other roots are removed and you can see the one real thick main root. Use your body to start pulling and rocking the tree. This works best if the tree is NOT cut all the way down to the ground and not taller than you. As you rock it back and forth using yourself to push it as far as you can, you'll hear cracking noises. Keep doing this and removing any dirt that stops you from pushing it farther until it finally breaks and is out. Refill the hole with dirt.
- 3. Okay say you have a stump that you can't dig out because maybe electric lines run by it or some other reason. First cut the stump down as close to the ground as you can get. Next get out your trusty drill and a drill bit for making holes (best the ones that make the hole for door knobs). Now drill a hole in the top of the stump a few inches deep. Fill the hole first with water, then with a fertilizer high in nitrogen. For instance, you could use cow manure. If you're using a commercial fertilizer instead, make sure the first of the 3 numbers of the fertilizer's NPK is the highest (for instance, a straight nitrogen fertilizer such as 45-0-0). Soak the ground all around the stump. Cover the stump with a plastic tarp. The tarp will act as a barrier to help retain moisture in and around the stump. Moisture is a powerful ally to have on your side for tree stump removal. Apply an organic mulch over the plastic tarp, and water it thoroughly. An organic mulch, such as tree bark or hay, will hold additional moisture, keeping the area even wetter. Wet mulch is also heavy, which will help weigh the tarp down, so that it doesn't blow away. For additional weight, roll some heavy stones onto the tarp. The final thing you need to do for this tree stump removal project is -- to be patient! You're speeding up the natural process of rotting by employing the steps above, but this tree stump removal technique is still not for those who need the stump to disappear N-O-W. You'll reduce the wait for completion of your tree stump removal project, however, by periodically removing the mulch and tarp for a moment and once again thoroughly soaking the stump and the ground around it. If you still have that nitrogen source at your disposal, add more of it. Then reapply the plastic tarp and mulch. Soak the mulch again, too, to keep the tarp wet and weighed down.
5. This little tip is for the ladies: Get your husband to do it. LOL :) Happy Stumping!!
Sunday, April 11, 2010
Homemade Bee Traps.
Spring is here finally and the the bees are out buzzing around. However the case, those little pests can be annoying especially when having cook outs or maybe you're allergic to bee stings.
Why are bees important? Bees are a very important part of our ecosystem. Remove one element and the system will need to make adjustments. The effect of that adjustment may often not be known until after it has happened. Now, with bees and honey bees, in particular we know that over one-third of our food supply relies upon them for pollination services and we know that pollination is essential for the reproduction of the plants the bees service. The honey bee is a major pollinator of many of our food crops, almonds, apples, avocados, blueberries, cantaloupes, cherries, cranberries, cucumbers, sunflowers, watermelon and many other crops all rely on honey bees for pollination.
Now that I've said that here's a good solution to that problem. I myself (Handyman Gene's wife) have tried this & it does work.
I came across these on the internet on how to make these out of 3 liter bottles. Cut the bottle a third of the way down and invert the top into the bottom. It looks like a funnel inside the bottle. Then punch hoes in the sides in which you will put wire to hang from a branch or crook. I used old pineapple juice in mine. I hope you can get the idea from the photo. Hope this helps. I think you could use the small personal sized water bottles too. You can use almost any sweet juice with a few drops of dish detergent like Dawn.
Try using a little bright (red?) food coloring in the water and soap mixture as: the color looks better in the yard,helps hide the dead bodies, and serves as an attractant.
I did use this method through out the summer under my open car port to keep the bumble bees away which were quite a lot and it worked like a charm. In 5 days I caught well over 50 bees....over a dozen the first afternoon after I hung the first one. They will fly around in there for a day or two but they will eventually drown in the nectar.
Step by Step Instructions:

1. Take a plastic bottle and cut the neck off. (The neck is the cone part of the bottle including the cap.)

2. Flip the neck upside-down, removing the cap first, and place the neck into the bottle.

3. Tape and/or staple the top together with the bottom of the bottle. (I didn't have to do this part. I just simply set it on top) Keep in mind that you will need to take them apart often to switch out the bait and remove dead wasps.

4. Bait your trap. It should not reach the opening of the bottle (The bees should have to completely enter the trap in order to access the bait). You can also do this before you attach the two pieces together.
Some bait ideas:
* 1 tsp liquid Dish soap, 1 tsp sugar (to attract them), and water - if they
do get out, they will still die from the dish soap.
* soda (lemonade etc) that has lost it's fizz. This way it can still be of
use. Add a few drops of washing up liquid.

5. Hang where ever the bees are a problem at. I found it best to hang it where there is a over hang that way it does not get filled with rain water.
Why are bees important? Bees are a very important part of our ecosystem. Remove one element and the system will need to make adjustments. The effect of that adjustment may often not be known until after it has happened. Now, with bees and honey bees, in particular we know that over one-third of our food supply relies upon them for pollination services and we know that pollination is essential for the reproduction of the plants the bees service. The honey bee is a major pollinator of many of our food crops, almonds, apples, avocados, blueberries, cantaloupes, cherries, cranberries, cucumbers, sunflowers, watermelon and many other crops all rely on honey bees for pollination.
Now that I've said that here's a good solution to that problem. I myself (Handyman Gene's wife) have tried this & it does work.
I came across these on the internet on how to make these out of 3 liter bottles. Cut the bottle a third of the way down and invert the top into the bottom. It looks like a funnel inside the bottle. Then punch hoes in the sides in which you will put wire to hang from a branch or crook. I used old pineapple juice in mine. I hope you can get the idea from the photo. Hope this helps. I think you could use the small personal sized water bottles too. You can use almost any sweet juice with a few drops of dish detergent like Dawn.
Try using a little bright (red?) food coloring in the water and soap mixture as: the color looks better in the yard,helps hide the dead bodies, and serves as an attractant.
I did use this method through out the summer under my open car port to keep the bumble bees away which were quite a lot and it worked like a charm. In 5 days I caught well over 50 bees....over a dozen the first afternoon after I hung the first one. They will fly around in there for a day or two but they will eventually drown in the nectar.
Step by Step Instructions:

1. Take a plastic bottle and cut the neck off. (The neck is the cone part of the bottle including the cap.)

2. Flip the neck upside-down, removing the cap first, and place the neck into the bottle.

3. Tape and/or staple the top together with the bottom of the bottle. (I didn't have to do this part. I just simply set it on top) Keep in mind that you will need to take them apart often to switch out the bait and remove dead wasps.

4. Bait your trap. It should not reach the opening of the bottle (The bees should have to completely enter the trap in order to access the bait). You can also do this before you attach the two pieces together.
Some bait ideas:
- Meat - This is the best choice in the spring and late winter because wasps
- are making nests and laying eggs, so they're searching for high protein
- food; you may even catch a queen this way, in which case the bees will
- relocate their nest.
- Dish washing liquid and water
- Mashed grapes
- Sugar and lemon juice
- Sugar and water
- Sugar and vinegar
* 1 tsp liquid Dish soap, 1 tsp sugar (to attract them), and water - if they
do get out, they will still die from the dish soap.
* soda (lemonade etc) that has lost it's fizz. This way it can still be of
use. Add a few drops of washing up liquid.

5. Hang where ever the bees are a problem at. I found it best to hang it where there is a over hang that way it does not get filled with rain water.
Sunday, April 4, 2010
Sweating Pipes
To eliminate sweating cold water pipes during the summer months, place foam pipe insulation over the pipes. The tubing keeps the warm humid air from condensing on the cold pipes.
Subscribe to:
Posts (Atom)